Wednesday, March 31, 2010

Mommy Planned It!

Have you heard of a home management binder? A mommy planner? Or any of those other wonderful tools to help mommies brains from boiling over? Well, after getting frustrated of having all my organizing tools spread here and there and losing them all the time I decided I would make my own "Mommy Planned It" binder.


To make this I started with a plain three-ring binder, scrapbooked the outside with paper, fabric and mod podge. Of course, this is an extra step one I added because I wanted something pretty sitting on my counter rather than a plain, white, vinyl binder.


Inside I have dividers and page protectors, I highly recommend the dividers with pockets in them (I will share why soon!). My dividers are labeled with the following: Calander, Kitchen, Bills, Shopping, and To Do's/ Honey Do's.


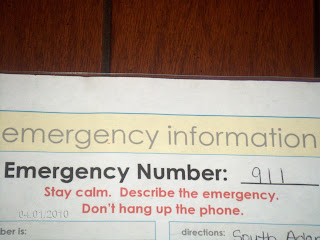
The very first thing when you open the binder is our "Emergency Information". This includes our address, emergency contacts, directions to our house, and our emergency plan. I keep this paper in a clear page protector and first because it is easiest for them to find. A really great site that I use and get most of my guides are free printables from Organized Home.


Next, I have my "Calander" tab. In this divider there are a front and back pocket. I use the front side to keep any appointment cards or reminders. The back pocket I use to hold my planner. In this section of the binder, I keep a "Birthday and Anniversaries" sheet listed with all of those special occasions I need to remember and they are organized by month. This template is also a free printable from Organized Home.


"Shopping" section come next. Again, using a 2 pocketed divider, I use the front pocket for local grocery ads, and the back side for coupons. Within the section I keep several blank shopping lists. There are several out there on the web that are free printables, try to find one that works best for you. I also keep a "price book", this lists the stores, item, size, and cost of things we buy often. This comes in handy when I am trying to compare prices and/or remember where I found the 4lb. jar of peanut butter?!
"Kitchen", in the front pocket I keep new recipes I find or cut out of a magazine. The back pocket of the divider I store all the recipe cards for the meals I have planned so they are quick and easy to find. Within the section I keep my current and previous monthly menu planners. I also store a "Favorite Recipe" page, this has the name of the recipe, where to find it, page number and comments. Keeping recipes within this tab is conveinent too.
Bills, the front pocket of the divider is for next month/future bills. The backside of the divider I store my current bills for the month. Within this tab is our monthly budget and our savings plan.


Next tab is the "To do's/ Honey do's". This is a peice I created myself. I keep blank copies of this for future use. We both write down our to do's, or what the other needs to do. I find this really helpful to make sure big projects are spread equally between the two of us and for the other to see who has what going on.

I love this binder! Everything has a purpose and its easy to change. If you think of a new section just pop open the rings and add to it! My newest pages are the "family yellow pages" this helps keep restaurants and business numbers easy to find. Also, I plan to add a "Projects" section. I will use the pockets to keep new projects I have found and another for things I need to pick up for current projects.
I hope you make one for yourself, and customize it to your liking.
Please share any tips you may have!
Best Wishes!

Saturday, March 13, 2010

New Sewing/Craft Table

In the past everytime I got the urge to sew, I would drag out my sewing machine and all my needed accessories to my kitchen table, work on my projects, and then clean it all up after I have finished. Sounds annoying? It was.


Lately, I have been using my guest room closet pulling a chair up to one of the built in shelves and working with what I had available. At least using the closet when I had to stop working I could just close the closet doors, that did eliminate some of the hassel of cleaning everytime I took a break.


Well, today I was working on a new sewing project (that secret will be revealed soon), I was cutting fabric on the kitchen table, running back to the guest room closet to sew a little more, then back to the table to re-pin and so on. Well, my hubby got home from work at 2pm this afternoon and decided he would start working on a sewing table for me.

Originally, I think the plan was much more simple then it ended up being. My suggestion was to only use what we have, he went on a search of our garage and found all the needed wood to make the table. I think the best part is he found a board left here by previous tenants, something I had not found yet. It says, "Sew What. Custom Sewing ~ Originals". Brilliant right?! I sure thought so, you know if I had found this it would have been up on a wall by now. So, Jason decided this board would make the perfect desktop (so did I :)). Well, after hours of hard work, making things more detailed and of course, my adding my 2 cents worth of ideas this is what the finished project looks like.


I feel soooo lucky to have such a great hubby to whip this out for me! Love you babe!


Saturday, March 6, 2010

Printable Grocery List and Menu Planners

Here are the grocery lists and menu planners I use. The grocery list is wonderful and suggested to me by Becca. I use the "master list" highlight what you need and then check it off once you get it at the store. The menu planner is wonderful too. Sometimes I will just use my day planner. Do what works for you! Enjoy.

This Weeks Grocery List

This will vary for each of you. Since I have been doing this menu planning regularly and know what my family uses a lot of, we stock up on those things once a month and they sometimes last for two to three months before we run out. For the meals listed on the plan, the following is all that I need:
milk
1 can cream of chicken soup
sour cream
broccoli florets
italian sausage
lasagna noodles
french bread
hotdogs
hotdog buns
2 pkgs enchilada sauce mix
jalapeno
bell peppers
taco sauce

Thats it!

Its Sunday... Got back from the store and only spent $28.00! Can you believe one weeks worth of groceries and I spent only $28.00! Gosh.. I'm good!

This Weeks: "What's Cookin"

This Weeks: "What's Cookin"
Monday: BBQ Crock pot Pork Chops, Cheesy Scalloped Potatoes and Steamed Green Beans
Tuesday: Creamy Chicken, Broccoli and Rice Casserole
Wednesday: Mini Pizzas
Thursday: Lasagna and Cheesy Garlic Bread
Friday: Chili Dogs
Saturday: Chicken Enchiladas and Spanish Rice
Sunday: Chicken Noodle Soup
Dessert: Oatmeal Raisin Cookies
Ok, hopefully you all attempted to try some of the meals from last week or began using your own weekly menu. I am going to change things up a bit. Menu planning helps with being prepared for what to make and reducing stress; this week I will include how much this will save on money. This week will also include one dessert. I like to bake something up on the weekends and we snack on it all week. I will try hard to include serving sizes and prep times.
In the past, when I went grocery shopping, I would grab anything that looked like I could throw it in and make a great meal. Now, with planning and reviewing our local ads I am shopping less and spending less on the few trips I do make. This makes me very happy! Like I mentioned before, I shop for my everyday essentials once a month, and I buy these items in bulk. This month on my once a month trip to Costco and Wal-Mart I spent $164.00. Then just for the missing ingredients I needed for last weeks menu I spent an additional $ 46.98 at Safeway. This may sound like a lot but do remember the $164.00 spent at Costco and Wal-Mart were things that will last one month or sometimes more.
I will also include my shopping list of just the ingredients I do not have on hand. Tomorrow, since I do my shopping on Sunday mornings, I will post my total of what was spent for the weeks worth of meals.
Look under the "~Recipes~" tab at the top of this page for all recipes.
Have a Great Week!
~Keli~

Tuesday, March 2, 2010

Snack Bag Anyone?


This is a cute little Thomas the Train snack bag. I made this for my son, Payton. I found the idea from "So you think you're crafty", click here for the tutorial. I will in the future be making some adjustments to this. I feel the bigger bag was to small even for a sandwich and the closure makes it smaller. I will probably use the same flap, but I will add a snap or Velcro to keep the bag closed. Also, I will use bigger measurements. The idea of using a Ziploc for the internal lining was a fabulous idea!


Happy Crafting Everyone!

Sincerely,
Your Homemade Momma of 2!

Keli